Hold on a second, cowboy. First of all, if you really want to start taking pictures during the night, you need to get familiar with manual mode. There’s no possibility that you will get nice results using auto mode or night preset.
Another issue is that without a tripod there’s a small chance that your pictures will be sharp. Actually it’s almost impossible. If all the above is not a problem for you, let’s get to the topic.
Things you will need:
- Tripod
- Cable release
- Camera
Not necessarily in that order, but all 3 are important. Fast lens will be also useful especially for capturing skies. You can argue that cable release is not that really important. True, but I still recommend it as it gives you the ability to expose for more than 30 seconds. Releasing the shutter is much more convenient than using camera built-in timers. If you don’t own one, it’s not the end of the world but get one – the simplest one is cheap and will be useful for many other situations too.
One more thing that is very useful when you are out shooting in the night – flashlight! Or your smartphone – with a cool app should be enough.
Light pollution
Shooting Milky Way in the middle of the city is usually a bad idea. Unless the city is abandoned or there’s an electricity outage. Otherwise you will get the light pollution and the only thing you will capture is the light coming from the city, not from the sky. The best places for taking breathtaking night sky pictures are the places far from the cities, far from the civilization. And by far, I mean really far. Even a distant city may create quite big light pollution over the horizon.
[full_width_image] [/full_width_image]
Moon is not cool
Moon is cool, when it’s the subject of the photo. When it’s the only subject of the photo. However if you are willing to take a picture of the sky, moon is not cool at all. It’s another light pollution we talked about in the previous paragraph. So basically if you are going to take night pictures of a sky check on the web when the moonrise is, and choose the time when the moon is not visible.

Photographing the moon is fairly simple. As long as you have a stable tripod and long lens you should be able to capture a nice moon details regardless of the light pollution – moon itself is bright enough. The picture above was shot using 200mm lens + teleconverter 2.0 on APS-C sensor which gives 600mm full frame equivalent. Exposure parameters were ISO 250, f/7.1 1/250s. Always use manual settings, automated modes will give you overexposed images and you will lose all the moon’s details.
Star trails
Stars move. Actually according to Copernicus earth is the one which moves. And we can clearly see that movement when we set the shutter open long enough. On the image we will see lines (curves) instead of stars. If this is not what we want to achieve there’s a quick formula which tells us what the longest shutter speed is for a given focal length. What we need to do is to divide 600 by the focal length and the result is the maximum amount of time which will give us sharp stars without any trails.
600 / 24mm = max 25s
600 / 15mm = max 40s
So, the wider you go, the more time you have for a single frame before you start to notice star trails.

The picture above was exposed for 4-5 minutes, and we can notice very obvious trails.
Camera settings
For the best results you should use aperture not bigger than f/4. During the night there’s so little light and you shouldn’t limit it even more with small apertures. You can experiment with ISO, but probably the native value is too low and you will need to crank it up, sometimes even to 3-6k to be able to capture all the light without having star trails. Fast lens and camera with good noise performance on high ISO is the best for that kind of pictures.
Summary
Having the last paragraphs in mind, it’s pretty clear, that wide and fast lens is the best for photographing the skies and trying to capture the Milky Way. Wide angle gives us more time and fast lens saves us from using very high ISO.
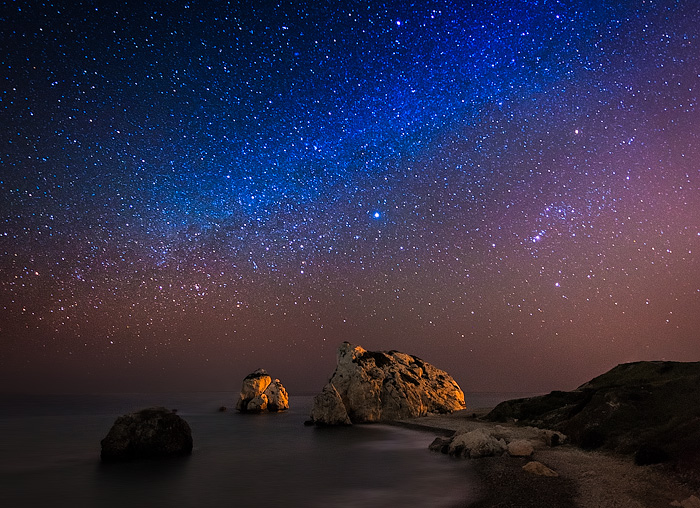
Dear Tomasz thank you again for this great tutorial . Can you please give us some exif info on the first photo of the Rock of Romeo (petra tou Romiou). your picture is really sharp and the milkyway as a beautiful blue color . I was also wondering if you use a torch to light the rocks on the right side. thanks
Hi Marios, I will share exif info as soon as I get home. The light on the rock is coming from the motorway nearby, so no other light source was used. thanks for your comment!
Hi Tomasz, You talk about your equation for calculating exposure for shooting stars, Do you use the physical focal length of the lens or do you need to use the “effective” focal length calculated with crop factor.
Thanks
Kris
Hi Kris!
I use the focal length for the full frame camera, so for the APS-C it should be recalculated taking crop factor into account.
Hi Tomasz, could you please explain this part more in the detail? I have a APS-C.
Thank you!!
APS-C is basically a smaller sensor, so using the same lens as on a full frame camera, you get a different picture (more cropped in). To get the same picture as on a full frame camera, you need to divide by a crop factor (1.5 in Nikon, 1.6 in Canon) the focal length. So for example 24mm lens in full frame is equivalent to 24/1.5=16mm lens on APS-C (gives you the same size of a picture).